Saturday, October 31, 2015

Moto X Force will feature a Shatterproof screen, house Snapdragon 810 SoC


It has been an interesting year for the guys at Motorola cause they're happily launching some of the best phones in the world. The Moto X Force launched earlier in the week as Droid Turbo 2 will be coming to India next month.

The distinguishing feature of the Moto X Force is that it will sport a Shatter-proof display panel, all thanks to Motorola's ShatterShield Technology.

Also, the Moto X Force will come with a four year warranty which cover all kinds of damage to display. Motorola has enrolled for a dual layer of touchscreens to ensure that the second layer even if the first layer is damaged.

Considering the specifications, the Moto X Force houses the Snapdragon 810 SoC which has a 2GHz octa-core processor. This is paired with 3GB RAM and comes in 32GB or 64GB storage options with the option to expand the storage. It will run the Android 5.1.1, and sports a 5.4 inch QuadHD display.The Moto X Force houses a 3,760mAh battery with Turbo charging for faster charging. It also support Qi and PMA wireless charging standards.


The camera will be same as the Moto X Play and the Moto X Style- 21MP rear sensor with f/2.0 aperture and 5MP front camera. It will support phase detect autofocus.

It supports 4G LTE bands, has Wifi with MIMO (Multiple-Input and Multiple-Output) , Bluetooth 4.1 as well as infrared.

The 32GB variant of the Moto X is priced at £499 (approx Rs 50,000) whereas the 64GB variant is priced at £534 (approx Rs 54,000).

Follow Me on Twitter>>> @iamBhavish
And like us on Facebook>>> The Gud1

[ROM]Unofficial MIU7 5.10.22 to Myphone My31/Lava Iris X8

[ROM]Unofficial MIU7 5.10.22 to Myphone My31/Lava Iris X8
Custom Rom For My Phone My 31 Screenshot 1

Custom Rom For My Phone My 31 Screenshot 2

Rom Features:

Pure Stock MIUI
Kitkat 4.4.2
Pre-Rooted
Google apps added
WSM Tools added
Some Modules added

How to Flash the rom?

Reboot to CTR
Perform Backup
Wipe Pre - Flash
Flash the Rom
Reboot
Done
REMINDER! Please make sure to back your NVRAM folder or IMEI before Flashing this one!
How to backup your imei [CLICKHERE]

Flash it with your own RISK!!!

I am not responsible for any damage or soft/hard brick will happened to your device!

Miui7 Full Rom Download Link:
Click Here


Credits:
Lino Constantino
Miui Rom

How to root and flash Custom Recovery for MyPhone My 31

How to root and flash Custom Recovery for MyPhone My 31

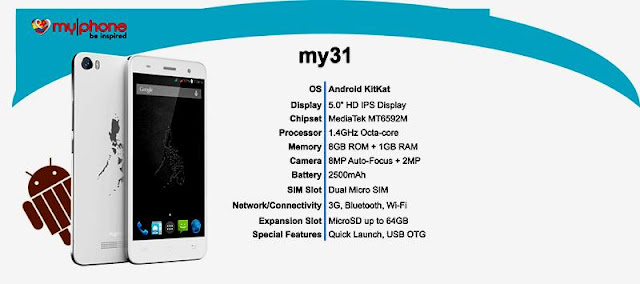
My Phone My 31 Specs


How to Root
Requirements:
Kingroot4.1.zip (download and extract)


Note: Need internet connection.
- Download and Install Kingroot 
- Open Kingroot  and tap "Try To Root"
- Wait to finished
- Reboot phone when done.

Replace Kinguser to SuperSU
- Download and Install supersu_me > Download Here
- Open supersume ( tap "allow" if kinguser pops up)
- Tap big circle
- Wait to finished
- Done.

Custom Recovery Installation
Requirements:

Using Rashrtools > Download on Playstore
For CTR recovery image > get here
For Philzrecovery image > get here

Note: Copy ctrkkrecovery.img or philzkkrecovery.img to sdcard\android -no need to rename

1. Open Rashrtools 
2. Tap "Grant" if supersu pops up
3. Tap "I know the risk"
4. Tap "Recovery from Storage"
5. Goto sdcard\android and Tap ctrkkrecovery.img or Philzkkrecovery.img
6. Reboot into recovery now  tap > "Yes Please"
7. magrerestart sya at ppunta sa custom recovery. touch screen po sya - meron keys sa bottom, Bilog pang enter.


Note: Tap BILOG sa bottom kapag nkatapat sa  "Reboot Sytem" at wag ma scroll for security reason. Mag oopen na Phone nyo. done.

Part3 Phone Backup > Battery atleast 50% sdcard free space atleast 3G up.
Download Quickboot (blu may kidlat sa gitna) sa playstore - rebooter po sya

1. Open Quickboot
2. Tap Recovery - kusa na sya restart at pupunta sa custom recovery (CTR/PHILZ/TWRP/CWM)
3. go "Backup/Restore"
4. choose "Backup to storage/sdcard1" - para sa sdcard sya mag save
5. Wait to see complete
6. Reboot system when done.


Credits:
Alesha Perales
My31 Group

Friday, October 30, 2015

How to root and Install Dual Recovery in Sony Xperia Z2

How to root and Install Dual Recovery in Sony Xperia Z2

Rooting And Install Dual Recovery For Sony Xoeria Z2 Picture


How to root Xperia Z2
Requirements:
rootkitXperia_20140719.zip

Instructions:

1. Setup adb including PATH (search how-to or see this tutorial)
!! These tools don't contain adb, so you have to setup adb, its PATH and adb driver !!
You will use adb after rooting, so you should setup it now.
DO NOT mirror rootkitXperia with adb.exe.

2. Enable USB debugging and Unknown Sources on your device. To activate Developer option Go to Settings and tap 7 times build number. Then Slide on USB DEBUGGING in DEVELOPER OPTION in the Settings.

3. Download and extract rootkitXperia_20140719.zip

4. Run install.bat and follow the instructions on the cmd.
If your device reboot and cmd says "完了しました" or "--- all finished ---", rooting is done.


This rooting works in the Xperia Version Below
・Xperia Z2 17.1.2.A.0.314
・Xperia Z1 14.4.A.0.108
・Xperia Z1 Compact 14.4.A.0.108
・Xperia Z C6603 10.5.A.0.233
・Xperia T2 Ultra 19.1.A.0.473
・Xperia SP 12.1.A.1.205

・Xperia acro HD SO-03D 6.1.F.0.128
・Xperia GX SO-04D 9.1.C.1.103
・Xperia SX SO-05D 9.1.C.1.103
・Xperia AX SO-01E 9.1.C.1.103
・Xperia VL SOL21 9.1.D.0.401
・Xperia Z SO-02E 10.3.1.B.1.1
・Xperia Z1 SO-01F 14.3.B.0.288
・Xperia Z1 SOL23 14.1.C.3.95
・Xperia Z1 f SO-02F 14.1.H.1.281
・Xperia Z1 f SO-02F 14.3.B.0.288
・Xperia Z Ultra SOL24 14.1.K.3.95
・Xperia Z2 SO-03F 17.1.1.B.2.73
・Xperia ZL2 SOL25 17.1.1.C.1.64
・Xperia A2 SO-04F 14.3.B.0.279


How to Install Dual Recovery
Requirements:

T2U-lockeddualrecovery2.8.21-RELEASE.flashable.zip

Procedure:
1. Make sure you have USB debugging turned ON.

2. Download T2U-lockeddualrecovery2.8.21-RELEASE.flashable.zip 

Windows:
unpack at C: or somewhere you will remember!
navigate to the resulting directory and look for install.bat, double click it to run;

Linux:
unpack in your home folder with 'unzip T2U-lockeddualrecovery2.8.21-RELEASE.flashable.zip'
navigate to the resulting directory and 'chmod +x install.sh', then execute it, follow instructions.

3. Your phone WILL reboot when installation has completed and it will go into the default recovery for the first boot.

4. Reboot to system from recovery to allow the installer to clean up after installation (it is safe to skip this step).


5. Enjoy DUAL RECOVERY! You can Backup now!


To go to Custom Recovery Just Reboot your phone Press and Hold Volume up or Volume down and Power Button


 Credits:
Androplus for rooting
Nut for dual recovery
XDA

HP Envy 13, Pavilion 13 x360, Pavilion 15 Star Wars Edition Launched in India

HP on Wednesday unveiled a slew of consumer and commercial PC devices in India. While the HP Envy 13, Pavilion 13 x360, and Pavilion 15 Star Wars Special Edition are consumer-facing products, the HP ProBook 430 G3 laptop, ProOne 400 G2 AiO, and ProDesk 400 G2 devices are for commercial use. All the devices ship with Windows 10.

The HP Envy 13, Pavilion 13 x360, and Pavilion 15 Star Wars Special Edition start at Rs. 64,990, Rs. 45,990 and Rs. 73,000 respectively, while the ProBook 430 G3, ProOne 400 G2 AiO and ProDesk 400 G2 start at Rs. 49,990, Rs. 49,000, and Rs. 45,000 respectively. All the devices are available to buy in the market except the Pavilion 15 Star Wars Edition, which would arrive on November 20.

HP Envy 13


The HP envy is quite slim (just 12.95mm thick) and sports a metal body. It supports Windows 10's biometric Windows Hello login feature with an integrated fingerprint sensor. The 13.3 inch display device will be available with sixth-gen Intel Core i5 and i7 processor options and promises a 10 hours battery-life. Bang and Ofulsen audio is standard.

Price: Starting at INR 64,990/-

HP Pavilion 13 x360


HP Pavilion 13 x360, as the name indicates that it is a convertible laptop which can be used in different modes as the display can be rotated upto 360 degrees. It features a 13.3 inch Full-HD resolution IPS touch display(1080x1920 pixels), and comes with sixth-gen Intel Core i5 and Core i3 processor versions, clubbed with Intel HD GPU. The base model includes 4GB RAM, 1 TB SATA drive (5400rpm), HP TrueVision HD webcam, and 48 nWh Li-ion prismatic battery. It measures 327.4x223.6x22.5 cm and weighs 1.71kg.

Price: Starting at INR 45,990/-

Star Wars fans there is a Surprise for You!

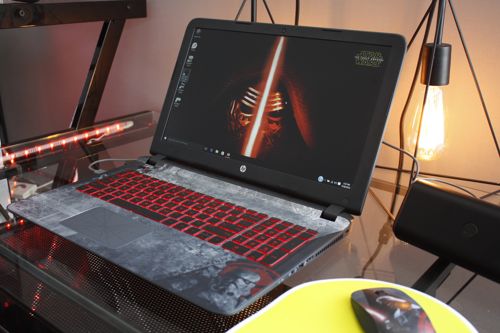
HP Pavilion 15 Star Wars Special Edition


HP Pavilion 15 Star Wars Special Edition powered by Windows 10, was one of the highlights at the launch event. It houses a 15.6-inch full-HD (1080x1920 pixels) resolution display, and comes with sixth-generation Intel Core i5 processor and is rated to deliver up to seven hours of battery life.


HP also showcased the Star Wars Special Edition Wireless Mouse along with the laptop. A similar- themed laptop sleeve is also available. Both accessories are sold separately. There's up to 16GB of RAM, an Nvidia GeForce GTX 950M GPU, solid-state and high-capacity hard drive options, Bang & Olufsen sound, and optional Intel RealSense camera. It houses 1TB of inbuilt storage, of which 35GB is reserved for the system.


Users can even click on the Imperial Cog desktop icon to access the Star Wars Command Center for browsing the Star Wars Special Edition's themes and galleries. This would give users access to content collections with over 1,100 images spanning 40 years of Star Wars history. For hardcore Star Wars fans, the laptop features Aurebesh font to type in Galactic Base Standard language. HP launched the Pavilion 15 Star Wars Special Edition outside India earlier this month.

HP ProBook 430 G3


HP ProBook 430 G3, a compact Notebook with optional 10-point touchscreen sleek design, and latest generation technologies delivers powerful performance in the office or on the go. Proven reliability and comprehensive HP security features help keep your data and investment protected. The HP ProBook 430 helps keep sensitive data secure with comprehensive security features like HP Client Security and HP BIOSphere as well as the embedded TPM 1.2

Price: Starting at INR 49,990/- 

HP ProOne 400 G2 AiO & ProDesk 400 G2


ProOne 400 G2 All-in -One
The HP ProOne 400 G2 AiO and ProDesk 400 G2, like others run on sixth-generation Intel Core processors and is designed mainly for SMBs. The ProOne 400 G2 (seen above) features a 20-inch IPS LCD display with 1600x900 pixels resolution and supports maximum of 32GB DDR4 SDRAM, and 2TB SATA drive (5400rpm) as well. Besides an 1-megapixle webcam, DTS Audio tech supports the AiO's sound system.

Price: Starting at INR 49,900/-


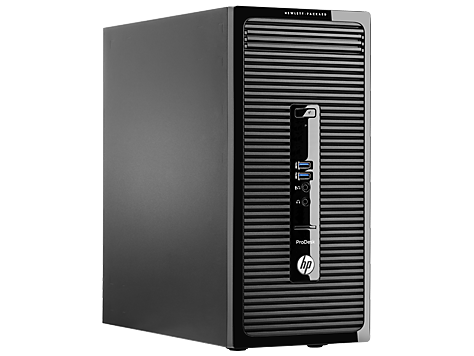
ProDesk 400 G2
The ProDesk 400 G2 Microtower PC supports a range of Intel Core i3, Core i5, Core i7, Pentium and Celeron chipsets and can support up to Windows 10 Pro (64-bit), 16GB DDR3 SDRAM, and 2TB SATA drive (7200rpm). It can run Intel HD, AMD Radeon, and Nvidia GPUs, weighs 6.5 kgs and measures 165x358.8x355mm (without stand).

Price: Starting at INR 45,000/-


Follow Me on Twitter>>> @iamBhavish
And like us on Facebook>>> The Gud1

Pirates Legend Free Download

Pirates Legend Free Download
Screenshots of the Pirates legend for Android tablet, phone.


Pirates legend - Monkey D. Luffy, also known as "Straw Hat Luffy" go in a dangerous adventure through oceans with a crew of brave pirates. Explore lost ships and take part in sea battles. 
Game features:
  • Fearless pirates
  • Endless oceans
  • Absorbing missions
  • Amazing treasures

This Android game takes you to the world of One Piece, where all pirates dream to get legendary treasure. Join in this search. Hire a variety of pirates to your team, each with unique superpowers. Command your pirates in intense battles with many opponents. Get equipment for your heroes. Become the real pirate king!

Download Link:

Instructions:
Download OBB and extract and place in Android/OBB folder
Install APK and Run the game!

Thursday, October 29, 2015

[ROM]Samsung Galaxy Note III for Cosmos Z

[ROM]Samsung Galaxy Note III for Cosmos Z

Custom Rom For Cosmos Z Screenshot 1

FLASH AT YOUR OWN RISK(!!!)
I'm not held liable to any damaged phones,bricked phones,damaged sdcards done by this ROM
Remember to do a nandroid backup before flashing ROMs.


Samsung Galaxy Note 3 for Cherry Mobile Cosmoz Z.


Highlights:
• Note 3 UI
• Launcher 5×5

• Missed Badge
• Air Gesture (Homescreen, Gallery)
• Smart Scroll
• Smart Pause(WORKING )
• Ink Effect on Lockscreen
• Transparent AccuWeather Widget
• Samsung style status bar icons
• Swipe to Call and Swipe to Message
• Fully Deodexed & Zipaligned
• Build.prop Tweaks
• Init.d support
• Floating Video Player
• Ram Booster
• Pre-Rooted

• Smart Pause
• VIPER4ANDROID 
• Snappier and smooth.
• SNOTE & other apps included
• Samsung Note 3 FONT
• More Ram Free
• Battery Saving
• Removed many unwanted things which don't have use

and many more……………


Screenshots:


REMINDER! Please make sure to back your NVRAM folder or IMEI before Flashing this one!

How to backup your imei [CLICKHERE]

Flash it with your own RISK!!!

I am not responsible for any damage or soft/hard brick will happened to your device!

ROM:


Installation Procedure. (CWM/TWRP)

  • Move the ZIP file to the root folder of your SD card. 
  • Boot your CZ into recovery mode (Volume up + Power key).
  • Wipe your data or do a factory reset (This is a must!)
  • Go to Mounts and Storage and select "Format/system"
  • Go to Advance and select "Wipe Dalvik Cache"
  • Then go to "Install Zip from sdcard"
  • Locate flashable zip file.
  • Wait for the flashing process to complete then reboot your phone.
  • Enjoy


BUGS?

  Ireport nyo nalang po sa mama nyo :)


Credits:

XDA Devs
Stock Rom ni Sir Erwin Canillo
Zopo Devs

Tj Condino


[ROM] MIUI7 v5.9.17beta_102315 for Firefly Mobile Intense Mini

[ROM] MIUI7 v5.9.17beta_102315 for Firefly Mobile Intense Mini


Custom Rom For Firefly Mobile Intense Mini Screenshot 1


MIUI 7 V5.9.17 on beta so expect minor bugs
.


REMINDER! Please make sure to back your NVRAM folder or IMEI before Flashing this one!

How to backup your imei [CLICKHERE]

Flash it with your own RISK!!!

I am not responsible for any damage or soft/hard brick will happened to your device!
..
ROM LINK MIUI7

NVRAM FIX
Click Here


SuperSU :
Click Here

 DOLBY ATMOS :
 Click Here

How to Flash:
use CWM
wipedata/factory reset
wipe cache
wipe dalvik cahe
.then install zip from SD Card.


Credits:
Jomar Lang
Firefly Intense Mini Group
Miui 7


How to Root and Install TWRP recovery for ASUS Zenfone 2 Laser

How to Root and Install TWRP recovery for ASUS Zenfone 2 Laser

Asus Zenfone 2 LAser Root and TWRP

Requirements:

Method 1:
  1. Download and Install ADB Fastboot tool 
    Run it (Require administrator privileges)
    Press Y/Yes to install ADB and Fastboot or N/No to skip
    Press Y/Yes to install ADB system-wide or N/No for current user only
    Press Y/Yes to install Drivers or N/No to skip
    Continue Driver installation
    finished!
  1. Enable USB Debugging via Settings>Developer Options (if no developer options go Settings>About>Build number tap 7x then developer options will show up in settings)
  2. Download mod_boot.img (Download|Mirror Download)
  3. Enter fastboot Mode (Power+Volume up)
  4. Connect Zenfone 2 Laser with PC/Laptop
  5. at mod_boot.img folder open CMD (Shift+Right Click>Open Command Here)
  6. Type this command at CMD:
    fastboot boot mod_boot.img
     7. Now your phone should automatically reboot with root installed and working!

Method 2 (Beta):

Automated" way: If your device already has USB Debug activated and you have the proper ADB driver installed, you can just use THIS SCRIPT. Just connect your switched on phone and it will do all the steps! 


Zenfone 2 Laser Root Success
Zenfone 2 Laser ZE500KL Root

Thanks and Credit to:
XDA Thread
Miau9202
www.asus-zenfone.com

How to Install TWRP recovery
Requirements:
TWRP.zip
  1. Download TWRP.zip for Zenfone 2 above
  2. Place it to ADB Folder (Download Here if you don't have it)
  3. Unlock Zenfone 2 Bootloader (Tutorial here)
  4. Turn off Zenfone 2 
  5. Boot into Bootloader (by pressing Power button + Volume up)
  6. When you see fastboot GUI, connect Zenfone 2 to PC/laptop
  7. at ADB+TWRP folder open CMD (Hold Shift+RightClick > Open command Here)
  8. At Command Promt Type:
    fastboot flash recovery twrp.img
  • Then press vol down 2 times until "Reboot recovery" shows up and press power 1 time to boot into recovery. You can now backup your phone.
Thanks and Credit to:
 TheSSJ
www.asus-zenfone.com


How to root Zenfone 2 in 2 ways and Install Custom Recovery (CWM)

How to root Zenfone 2 in 2 ways and Install Custom Recovery (CWM)

 Rooting Zenfone 2 in 2 ways and Install Custom Recovery (CWM) Main Picture


Requirements:


  1. Download Pre-rooted image from hereCheck the model number of your Asus Zenfone 2 and download the pre-rooted image for your model number. To check model number go to Settings > About Phone > Model name. 
  2.  DRIVER
  3. Minimal ADB and Fastboot Tools

How to install Minimal ADB and Fastboot tools


  1. From the downloaded folder open 2_setup.exe and start the installation process by following on-screen instructions.
  2. Once you have installed it go to C:\Program Files (x86)\Minimal ADB and Fastboot (for 64 bit systems) or C:\Program Files\Minimal ADB and Fastboot (for 32 bit systems) and open py_cmd.exe by right clicking on it and selecting Run as Administrator.
  3. Follow the on-screen instructions and Minimal ADB and Fastboot tools will be installed on your system.

How to root Asus Zenfone 2

Method 1.
You are now ready to root Asus Zenfone 2. Simply follow the step by step guide shared below to root Asus Zenfone 2.
  1. Extract the downloaded pre-rooted image for your Asus Zenfone 2 and place it on your desktop.
  2. Connect your Asus Zenfone 2 with your computer using a USB cable.
  3. Now open command window on your PC. To open command window press Shift Key + Right mouse click and select open command window here This will open command window on your computer.
  4. Once command window is opened enter the command shared below which will put your device in bootloader mode.
adb reboot bootloader
  1. Rename the image which you extracted before in Step 1 to img
  2. Now you have to flash the image on your Asus Zenfone 2. To do this you have to enter the command shared below in the command window.
fastboot flash system system.img
  1. It will take a couple of minutes to flash the image. Once it is flashed enter the command shared below which will reboot your device.
fastboot reboot
Your Asus Zenfone 2 smartphone will reboot. Enjoy!
How Install Custom Recovery (CWM) temporarily
Method 2.
Requirements:
  1. Download all the files containing temporary CWM package and extract the fastboot.rar to desktop.
  2. Turn on USB Debugging and then connect your phone to the PC.
    USB Debugging can be accessed by going to Settings> About> Software Information> Tap Build number 7 times. Then go 2 steps back and choose Developer options> USB Debugging.
  3. Copy SuperSU246.zip  to the  SD card.
  4. Run cai_dat_CWM.bat. In the command window, type ACCEPT (in capitals) and hit Enter.
  5. Type T4 and hit enter again. Your phone should restart infastboot mode, take the commands and then load the temporary CWM. It will take about a minute for this to complete.
  6. When the phone boots CWM Recovery, you can disconnect the device from the PC. Then select Install Zip by using Volume Keys to highlight and Power Key to select.
  7. Select choose zip from external sdcard and then select the SuperSU246.zip  file copied to the SD card in step 4. Select Yes – Install SuperSuxxx.zip to start flashing.
  8. When done, reboot your phone and that’s it. 
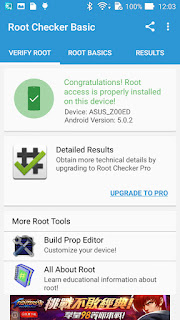
  9. Verify the root by installing any root checker app from the Play Store.

Note: This work tested in Zenfone 2 with version ZE550ML & ZE551ML