- Download and Install the Samsung USB Drivers
- Download and Extract Odin v3.10 onto your PC
- Download and extract CF-Auto-Root-t03g-t03gxx-gtn7100.zip
- Enter Download mode on your Galaxy S6 device. (hold Home, Power and Volume Down buttons for a few seconds and follow,click instructions)
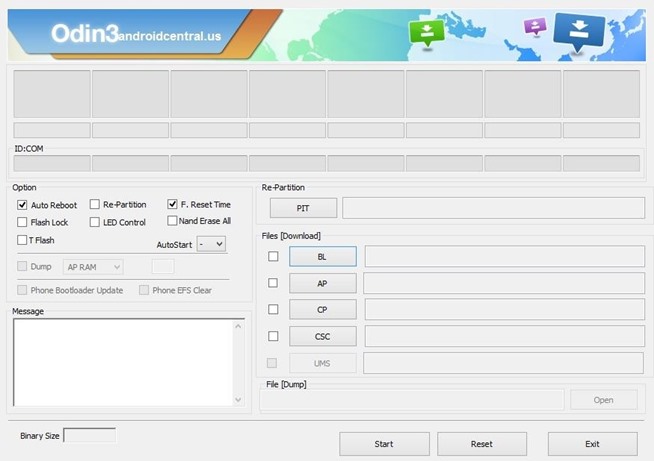
- Run Odin 3.10 on PC and Connected S6 to the PC using USB cable. Note: your phone must be in download mode.when you sucess conection your S6 to odin , Odin will show “Added message”.
- Through Odin click the AP button –> select the .tar.md5 file (unzipped file)

- Next, use a USB cable to connect your phone to your PC. After a few seconds, Odin will recognize your phone and a blue box will appear under the ID:COM field.

- Browse and Select the CF-Auto-Root-t03g-t03gxx-gtn7100.tar.md5 from file in Step 3
- Look at the Check Boxes on the Left Side of Odin
- Make Sure Only ‘F. Reset Time’ and ‘Auto Reboot’ are Selected

- Click START button. You may check everything for safer rooting process.
- Rooting process will finish in a few minutes. Then your galaxy note 2 will reboot.
To verified Just Download Rootchecker in Playstore!
How to Install TWRP Recovery
Credits:
TWRP
How to Install TWRP Recovery
Download Links:
Current and past versions of TWRP can be found at one of the mirrors below:
TWRP Install (Requires TWRP 2.8.4 or higher already installed):
Download the latest TWRP image file (.img) from the download link and boot TWRP. Go to install and find and select the Images... button. Browse to the image that you downloaded and select it. Choose recovery and swipe to flash.
Odin Install Method (No Root Required):
You will need to download and install Odin on your PC. Once you have Odin installed, download the proper .tar file for your device from the download link above. Power off your device. Turn on your device using the proper key combo to get into download mode and attach the device to your computer via a USB cable. Use the PDA tab or button to browse to and select the tar file that you downloaded and flash the device.
Note many devices will replace your custom recovery automatically during first boot. To prevent this, use Google to find the proper key combo to enter recovery. After typing fastboot reboot, hold the key combo and boot to TWRP. Once TWRP is booted, TWRP will patch the stock ROM to prevent the stock ROM from replacing TWRP. If you don't follow this step, you will have to repeat the install.
dd Install Method (Requires Root):
Download the latest image file (.img) from the download link above. Place it in the root of your /sdcard folder and rename it to twrp.img. Run the following commands via adb shell or a terminal emulator app:
sudd if=/sdcard/twrp.img of=/dev/block/mmcblk0p9
Credits:
TWRP


No comments:
Post a Comment